Showing posts with label makeup brushes. Show all posts

Tuesday, 18 October 2011

The easiest way to turn eyeshadow into eyeliner: A tutorial!

I have an Indian function to attend soon and I want to wear a pop of blue on my lids.  There's no point kidding myself that I'd have enough time to blend any shadows on my lids so I've decided to go for something easier.

Someone mentioned that mixing butter and peanuts does really give you peanut butter.  For some reason, my mind equated mixing peanuts and butter to get peanut butter with mixing eyeshadow and liquid to get eyeliner.  This is where the idea was born..

What you will need:
  • An eyeshadow colour that you want to wear as a liner
  • A facial mist/setting spray (you could just use water in a spray bottle)
  • A angled/non angled eyeliner brush (the cheaper the better because you don't want to be buying a NARS one that falls apart because you've gotten liquid into the ferrule and the glue has weakened).  All the brushes I have used will not break the bank and I can say that as I paid for two of them, one (the Revlon one) was a PR sample.
  • A small bowl (if you're Indian, a standard koli will do)

I used the following:
Regarding the differences between an angled and non angled eyeliner brush, this is what I mean..
The Ruby and Millie and Models Own ones are angled brushes and the Revlon one isn't.  It's also naturally two toned, it's a bamboo shade.  The only reason it's a bit black is because I've been using it to apply colour to my waterline.  I've reviewed the Revlon one here and the Models Own one here if you want to take a look.

How to turn eyeshadow into eyeliner:
    Practice this a few times before you wear it out just to ascertain how much colour you need.  You don't need to coat the whole brush in colour, it's enough to just coat the tip and a tiny bit of the sides.  I find it easy to do a thinner line first and then build it up but that's just me. 

    The result:
    I'm so pleased this worked out as well as I saw it in my mind.  You know how sometimes you have an idea in your head and then it doesn't work out in reality? I had a worry that this might be the case here but it worked out well.

    I can't say I'd do this before work because I'm always rushing but I'm definitely going to be wearing these as liners when I'm on my own time.

    If you want to go one step further and have two/three angled eyeliner brushes then you can be a bit more creative.
    I could have worked it in a bit more on my inner eye area but it was dark, this was a practice run, the dog ate it, it was like

    For this, I decided to utitlise my other eyeliner brushes.  You could do this look with just one brush but because I go back over and build colour up, I found it easier to use two. 

    If you only have one angled brush then doing this kind of look might take you some extra time but it's easy to remove the colour from the brush.  I spray the brush with the ELF spray and wipe it on a tissue.  The faff is worth it because it does get people asking questions as to how you did it.

    By the time I've finished, my eyeshadows are wet so I just dab at them with a tissue to take some of the moisture away.  I leave the palette open for about 10 minutes in a vain attempt to air dry it a bit.

    This just goes to show that you don't need to fork out for coloured liquid liners (as these are easier to apply if you're new to liner) and that you don't need to spend a fortune buying products that specifically turn eyeshadows into liners.  For my eventual look, I've decided to mix the pink with the purple and that's given me a pretty good shade.

    The colours in the Sleek palette when used dry are notorious for producing a lot of fallout but when you use them in this way, you don't get any fallout.  The ELF spray (which has been featured here before) is £3.50.  I did say that it smelt of cheese farts when you applied it to your face but in this context, you smell nothing. The Ruby and Millie i-Define brush (also featured here before) cost me about £1 with the Boots vouchers.  It might have even been free actually, I can't remember..  You can use any angled brush for this but if you really want the Ruby and Millie one, I'd suggest you get to Boots sharpish because Ruby and Millie is soon to be pulled from their shelves and the brush is currently on for £1.66.

    Tuesday, 4 October 2011

    Review: Daniel Sandler Waterbrush

    Last week, I was at work getting annoyed at a trainee so I decided to browse my Twitter timeline.  I came across a tweet that said something along the lines of "DANIEL SANDLER'S WATERBRUSH ON SALE FOR £5". 

    Now if this was a Hollywood (or indeed, Bollywood film), I'd have made an impassioned speech to my boss which ended in tears (his, not mine because he was so moved by the passion with which I spoke) and then a montage of me running home with my smooth locks blowing in the wind.  You'd know it was a film because 1)I don't run and 2)my hair is seldom smooth.

    However, as this is London and I am a professional, I worked away until it was 5 p.m. and I was able to rush home and order the brush.

    The website said that the brushes were out of stock but that more were expected to arrive on the following Monday.  My brush turned up on Tuesday, complete with the complimentary nail file that comes with every order from Escentual.com

    This is no normal blusher brush.  Daniel Sandler is famous for his Waterblushes so I'm glad he has had the foresight to make a brush that one can use in conjunction with that product.  The added benefits are that you can use it with other liquid blushers..such as Benefit's Benetint.
    Anyway, remember I blogged about the ELF Stipple Brush?  Well, the Daniel Sandler Waterbrush is a mixture between the standard blusher brushes and a stipple brush.  It looks like a standard blusher brush but if you look closely (or even touch it) you see that the hairs are not all the same length.  I think this is key in ensuring that application of liquid blusher doesn't look fake.  The hairs are not naturally pink, they're brown and white but I've already used this baby many a time.

    The hairs are synthetic (Taklon..I researched) which I think is the key again for smooth application as I find that natural hair blusher brushes (like this one) do tend to soak up a lot of the product instead of holding it until you're ready to put it on your face.
    I've been using Benefit's Benetint (read my review here) in conjunction with this brush as I find it easier than using the brush that Benetint actually comes with.  I draw a stripe down the top of the Waterbrush, stroke it in strips over the cheek area and then swirl the brush so it looks more natural.  You might be asking why there is that blob of colour on the right hand side..well, I sneezed whilst using it and it dabbed on from the Benetint brush.

    If you want to pick one up for yourself, head on over to Escentual.com now.  You can also follow Daniel on Twitter, he doles out fantastic makeup tips on a daily basis that actually work..I've tried them!  Escentual.com are also selling Daniel Sandler's POP Waterblush which is a limited edition colour and £5 from each sold will go directly to Macmillan Cancer Support.  I bought that too but I'm not cracking it open until I've made a sizeable dent in some of my other products!

    Thursday, 8 September 2011

    Why you NEED ELF's stipple brush!

    I finally managed to take advantage of ELF's free delivery dealy and the stipple brush was one of the things I ordered.  I read a fair few reviews about the brush and there were a fair few negative ones.  I'm glad I ignored them and bought this because I love it!
    I've always had an issue with my cream blushers just not applying properly.  When I use my fingers, I get mroe on my fingers than I do on my face and when I use a standard brush, it seems to never apply properly.

    My main problem was the fact that I could never actually see it applying on my skin and it never showed up in any photos so I didn't really see the point.

    The first time I used my stipple brush, I could see the colour actually being deposited on my cheeks so I was super happy.  Then I got a bit carried away and put too much blusher on and had to tone it down with some translucent powder. 
    The hairs are actually black and white, mine are pink because I've been abusing my blushers

    Using the brush is quite messy though, the plastic packaging around the outside of my blusher is now stippled with tones of blush but I can forgive that as now you can actually see the blusher on me.

    This brush is not super dense but I think that you don't want something super dense when you're just trying to apply a wash of colour to your face.  The hairs are really soft and the pick up pigment perfectly.  I washed it a few times and it hasn't shed any hairs which is another plus.

    The best thing is that it will only set you back £3.50 which is a bloody bargain!  You can pick it up from here..and whilst you're there, get yourself one of their matte lip pencils as they're on offer for £1 (down from £3.50) and they're very moisturising!

    Tuesday, 29 March 2011

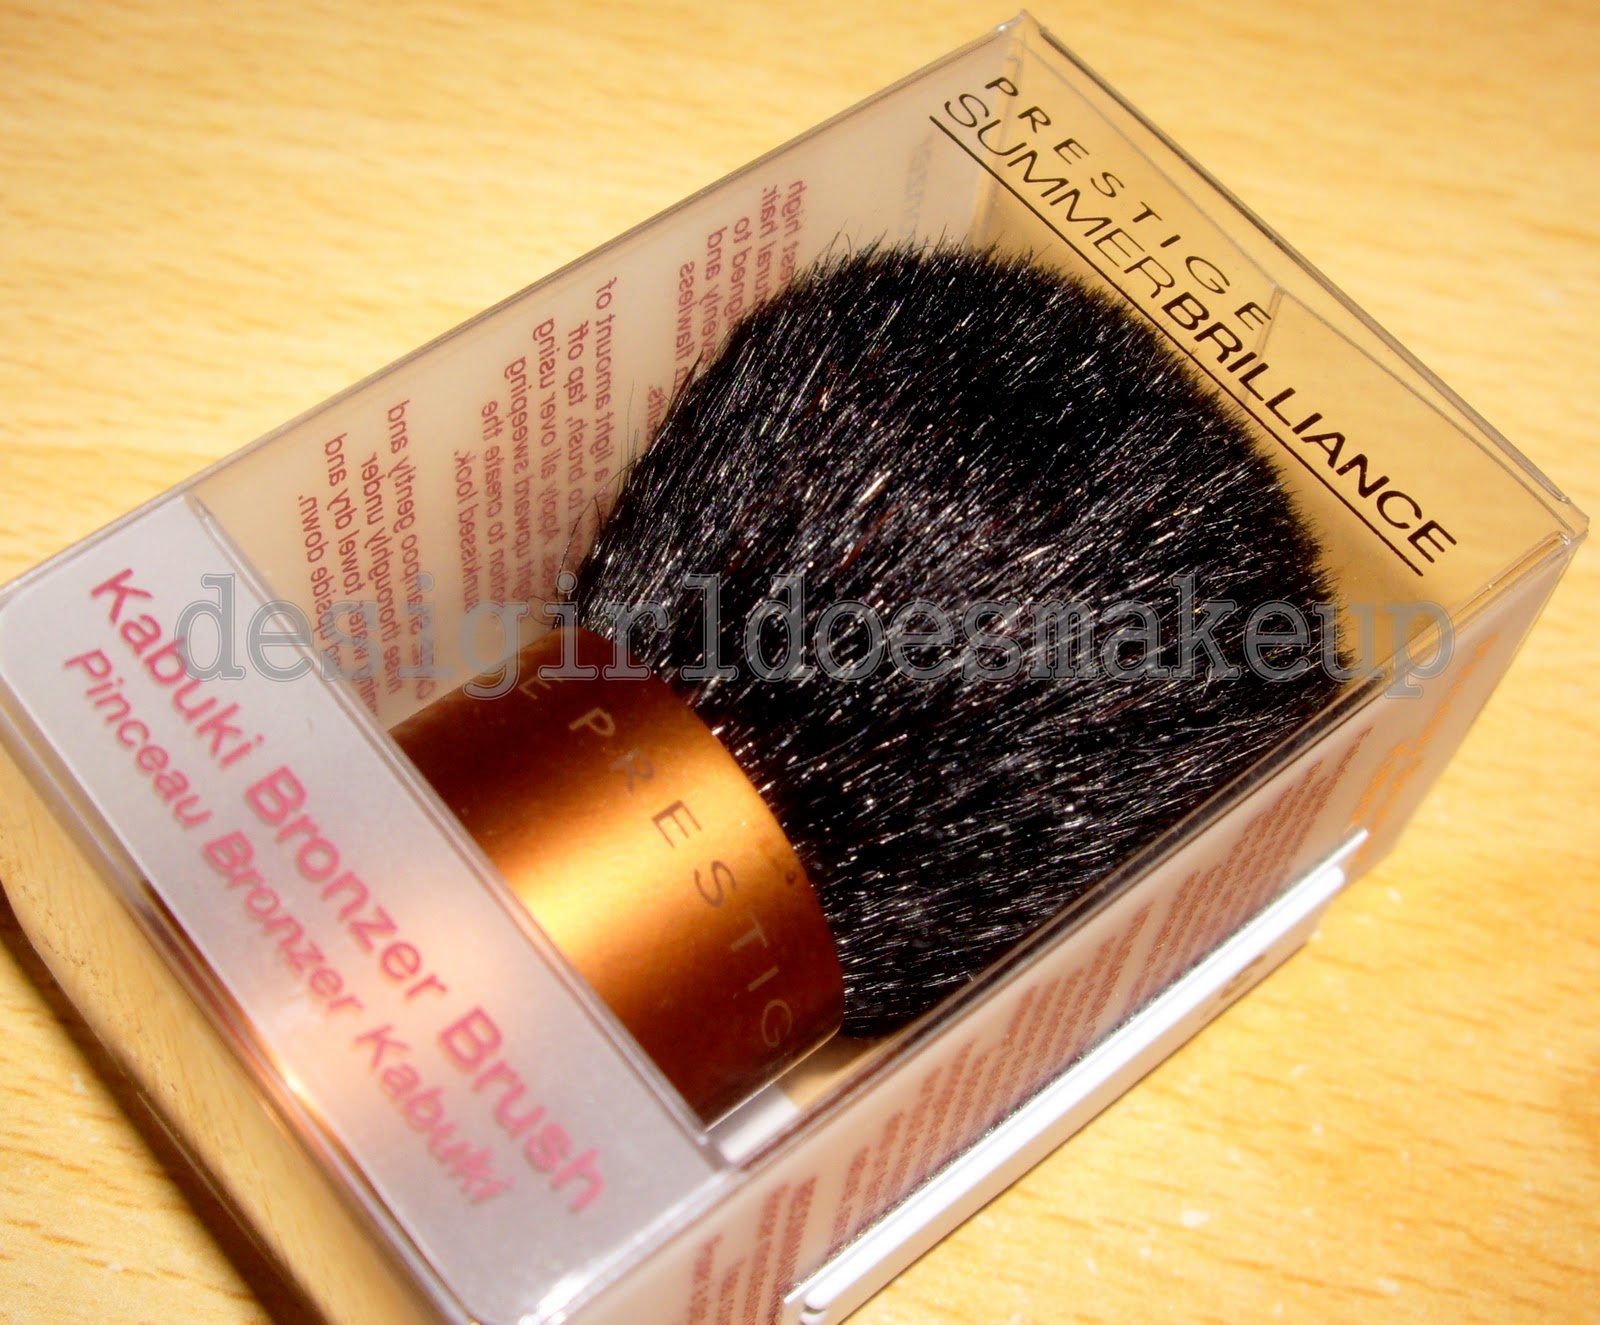
    DO NOT BUY: Prestige Kabuki Bronzer Brush

    This was a total impulse buy.  I had a list of things to look for..all of which I forgot.  I forgot (yet again) to check out the Topshop makeup range, didn't get to look at any brown eyeliner pencils, the 17 lipsticks I had my eye one and the Lancome counter didn't even register (I was looking for their liquid liner).

    This was on offer for £3 something.  It looked the perfect size for bronzing and thus it was bought.

    The hairs on this brush are super rough and scratchy.  Rougher than any brush for makeup application should be.  The blurb says that it is made from the finest hair.  I say if this is finest hair, what's the worst hair like?  The photo shows you how the hairs are all odd lengths and the domed part isn't even cut properly.  How this passed quality control is beyond me..

    Steer clear of this if you see it on sale anyway because you will be sorry if you pick it up.  I thought this might be a bad one but even the one on display was as rough as this.  The quest for a bronzer brush continues!

    Monday, 28 February 2011

    Review: ELF's Mineral Bamboo brushes

    These brushes have been in my possession long enough to be given the full five star Rhamnousia treatment so I can finally let you know what I think of them.  If you want to know more about the basics, click here and ye shall see all you need to know about this range.

    These are my test subject:

    First, the general points:
    • The bristles are bamboo coloured.  On the plus side, you can see how much product you have picked up.  This also means that the brushes look used a lot quicker so if you're funny about having brushes looking clean all the time, you will find yourself cleaning them more often.
    • When I first got the all-over eyeshadow brush out of the packaging, a powder came out.  I kept stroking it until all the powder had vanished.  It wasn't a large amount of powder but I've never had that situation with any brush I've used before.
    • The hair on the brushes is very soft.  The softness of these is on par with the brushes that Elizabeth Arden and NARS make.
    • When you take them out of their packets, they smell very plastick-y, much like those children's plastic chairs that we all had.  However, this smell all but faded once I'd taken them out of the packet.
    • They don't seem to pick up as much colour as my other brushes which is a good thing if you're new to using makeup as you don't want to be over zealous and look like a fool.  If you're a bit more advanced then this might annoy you a bit.

    Friday, 4 February 2011

    Adventures with a bent eyeliner brush..

    The brushes that came with all my gel liners have not been very good at lining my eyes, mainly because I feel that they don't give me enough control and the liner doesn't sit close enough to the root of the lashes for my liking.

    Thus, I went on the hunt for a bent eyeliner brush as I'd heard they were really good.  The two of choice were the Benefit Get Bent brush and the Sonia Kashuk one.  SK isn't readily available here so I have the Benefit one.
    When you take that plastic "protector" off, the brush is quite stiff and me being me had to bend the bristles to loosen it up a bit..then the panic hit me..what if I've ruined the brush?! Well, I hadn't so don't panic if you're compelled to do the same.

    Monday, 31 January 2011

    An alternative use for your foundation brush..

    Ever since a makeup masterclass at a Benefit boutique, I've been using my Kabuki brush to apply my foundation and it has been a very happy union indeed...or it was, until I washed it and it shed around 90% of its hair.  I need to find another one as I'm not going back to my foundation brush.  Therein lies my second problem..  I have no use for my current foundation brush..

    Lameting out loud as I always do, I told Simon about this sorry state of affairs.  His response was simple, use the foundation brush to apply face masks because I always "whinge" about getting them stuck under my nails.

    I tried it and it worked brilliantly..the mask was on and my fingers were clean.  It was all an even depth so it dried at the same time.  I find it easier to squirt the mask onto the palm of my hand, dab the brush in it and stroke it across my face.

    I remove my moisture giving masks with my fingers and my mud mask with my old Body Shop face brush.

    Does anyone else "recycle" their brushes and use them for things they're not specifically made for? A friend of mine uses a concealer brush to put her highlights in..

    Thursday, 27 January 2011

    ELF introduce Mineral Bamboo brushes

    It's that dodgy time after Christmas where you've recovered from the overeating but your bank balance hasn't and payday is but a speck of dust on the horizon..I get paid on February 1st but then I also get my February paycheck at the end of February so I can't whinge too much..  

    With this austerity in mind, ELF have released a range of mineral bamboo brushes which not only are good for the environment but will also not bankrupt you..
    See, all good things!
    As those of you follow me on Twitter will know, I have recently fallen in love with cream blushers.  I haven't found a decent method of applying them but these brushes give me some hope as the Taklon bristles can be used with both cream and powder products.  The bamboo handles are designed so that you don't get hand ache from holding your brush for a long time..which is something Simon laughed at until I made him time how long I hold my brushes for when putting my face on..

    There are a total of 12 brushes in the range and 2 sets..

    My only grumble is that the Kabuki brush isn't available on its Jack Jones and I can't see that many people who shop at ELF fork out £15 for just one brush.  I do have a few of these brushes which will feature on here at some point in the future, in the mean time I will leave you to guess which ones they are!

    Monday, 22 November 2010

    ELF: Large Makeup Holder

    I don't know how you can review a makeup holder, either it holds or it doesn't?

    Before this came into my possession I was strutting around with my brushes in this less than sexy setup.  It was a right pain as it had a tendency to topple over whenever I took my foundation brush out, which was a daily thing as I use that every single day.

    Then this came into my life and magical things happened.  I found myself with enough time to get ready in the morning and have some time to spare and actually get a cup of coffee down me.

    Although the illustration on the box shows it as solely holding brushes, I've put the following into mine and it lets me just grab what I want with minimal fuss and set straight to work.

    It's a great time saver and it's not as large as it looks which is good because you don't need too much space.  Simon quite likes it because I've managed to move all my "face stuff" to the bathroom so he can put his deodrant etc..on the old place and get ready in one room without me disturbing him.

    However, it's not all sunshine and rainbows, I found that there were some scuffs and what can only be described as glue leakages..

    Most of my smudges were on the back so you can't really see but I wouldn't be too happy if they were on the front and you were a stickler for good presentation.  The product itself isn't shoddy, the finishing just leaves a little to be desired.

    You can get it from ELF for the princely sum of £12.00.

    Tuesday, 21 September 2010

    Models Own brushes

    Back when Models Own had their 50% off sale, I bought some glittery polish and some eye makeup brushes.

    It's well known that I am not an expert blender and I am trying to improve using as many brushes as I can.  I was going to buy just the angled liner brush but when I saw that you could get three brushes for £7, I decided to take the plunge as it wouldn't be a fortune lost if I didn't like them.

    I have now used them a few times and here's what I think..I LIKE THEM.  The hairs are nice and soft and the handle size varies from brush to brush, you know how I am fussy about things like that.  I don't want a blending brush having a handle the size of a foundation brush and vice versa.  They look different next to my other brushes as they are white and the rest are black.  This causes a slight problem because they can get mucky quickly when eyeshadow is smudged on them but it's nothing a good wipedown won't fix.  I have washed these babies and they dry in super fast time so I'd say they're really good if you do a quick wash with your brushes everyday.

    Angled brush
    I find that a lot of these angled brushes only work with one type of liner, be it gel or powder.  I've used this brush with both and it works equally well with either.  I tend to use it more with gel liner bcause I prefer gel liner over cake liner.  The size of the handle with these brushes is important, I have used a brush before which had a massive handle (lengthwise) and it was nigh on impossible to tell if you had a good line because I was so far from the mirror.  That wouldn't be a problem for you if you weren't short sighted but as I am, it was a right pain in the neck.  With this brush however, you can get right up close and personal and see exactly where the product is going.

    Eye Shading brush
    I use this to apply colour to my lid and it does a very good job of both picking up enough colour and smoothing it over the lid.  It makes blending really easy and I feel that I don't have to put a lot of effort into it when I use this brush.  I have never used a blending brush which had a head of this shape, they are usually narrower and taller and they always give me unwanted results.  This follows the contour of my eye in the way that I want it to.

    Once I apply colour to the crease using the blending brush, I use this brush to blend the crease colour with the lid colour.

    Blending brush
    I was going to use this to apply the colour under my lower lashline but it was a bit too big for that so I used it to define the crease and apply the colour along it.  It does this very well and lends itself very well to laying colour.  I have also used it to blend out gel liner on the upper lashline when I'm doing an easy smokey eyed look and it is the perfect size for that.

    I have always struggled to apply colour to my crease and blend it out but this last brush is perfect for noobs, just apply the colour where you want it and use the eye shading brush on its side to blend it in.

    I've added a photo of a rough sketch EOTD I did with these brushes as it helps illustrate my points better..
    These brushes are brilliant if you are new to blending, I wish I had bought them before because they are fool-proof.  I have improved a bit since I started but I bet if I had these before, I'd have gotten further than I am now.

    You can buy these brushes from here for the princely price of £7 for the lot.

    Monday, 9 August 2010

    My favourites so far this year..

    Here they are:
    Holy over saturation of colours, Batman!

    I use all these products on either a daily or weekly basis which is pretty rare for me as I have so much crap.

    MAC 239 brush: I really don't know how I managed to get my eye makeup looking decent before I had this (I probably didn't).  With regards to brush hair density, it does very well.  They're tightly packed but you can get away with laying down and blending too.  It's not my blending brush, simply because it's not meant for blending.  If you're lazy/doing a look with bright colours, get this brush and you won't be sorry.  You can use it for crease work too, I switch it up between the 239 and the Revlon brush.

    Maybelline Colossal mascara: This is probably my all time favourite High Street mascara.  I use this every day and it has been going strong for a long long time.  I love this and my Prestige mascara but I think this slightly has the edge as it's foolproof and I get the same results regardless of how I apply it.  Thick, long, black lashes.

    YSL Teint Parfait: I blab on about this foundation a lot.  It was the first thing I ever reviewed on my blog but I'll give you a quick review of it now.  It's an oil free "foundation".  I say " " because you can use it as a primer if your skin is not behaving.  I like the fact that it has a dual personality like that because once I put it on, it doesn't come off unless you take it off.  If you have oily/combo skin and want a foundation which makes you look dewy, buy this and you won't be sorry.  The single best thing about this foundation is being photographed..you look airbrushed.

    I've got a swatch for you and it's clear it doesn't match the skin on my hand but it blends in seamlessly on my face.

    Dove Therapy Heat Defence spray: I really like this.  I feel that it does protect my hair from heat and it leaves my hair looking shiny after I've straightened it and it smells quite nice.  It makes my hair feel softer too so I've started using it even when I keep my hair curly.  The best thing about it is that you can be heavy handed and it won't grease your hair up which is brilliant.

    The Body Shop Facial Massager: I was intrigued with this when I first saw it online and decided to buy it when I saw it in store.  I use this on a weekly basis.  It smoothes my skin out a treat.  I also find that after using it, my skin absorbs moisturiser a lot better and it feels clean, like it's been drained of toxins.  It leaves my skin nice and pink after using it so I can feel that there is some massagey benefit there.  There's a full review here.

    Korres Zea Mays blusher: This has fast become my "brown girl's can blush too" blush.  When I wear it, it actually looks like I'm blushing which is brilliant.  It does contain glitter but use a light hand and you're good to go.  It looks practically untouched but I've been using it more often than not..  You can buy it here and read my review here.

    YSL Palette Pop: I have had this for a long long time and it's a tester. I don't know why I'm always saying that..but it is.  I think it's because I'm in shock that a tester lasts so long.  I use this on a daily basis, it's my "no effort" blush.  It looks so natural on me that you can't even tell that I'm wearing it most of the time.  People only notice that I don't look so perky when I don't have it on.

    See? You wouldn't think that was WOC friendly but it is brilliant for my skintone.  It also looks pretty chalky but applies like a dream.

    I haven't had these brushes for too long but they have found their way into my makeup bag.

    Revlon Foundation brush: There's a full review here.  It's all good.  The brush is totally foolproof and works brilliant when the operator is functioning on around 5 hours sleep.  It costs about a tenner from Superdrug.

    Revlon Blusher brush: I'm sure this brush was made just for me.  It fits the cheek area perfectly, stays soft and yet is dense enough to pick up just enough product.  The full review is here.  I think this comes in at around a fiver or so..it's less than a tenner!

    What have your favourites been so far this year?

    Wednesday, 28 July 2010

    Ruby and Millie i-Define brush

    I remember the first ever blending brush I bought, it was a Ruby and Millie dealy which I bought with my Boots voucher.

    It was pretty good for a noob like me so I decided to buy more of their brushes..

    Then I came across their liner brush which (I thought) would be heaven for those who had abandoned any hope of ever being able to use liquid liner properly.

    This brush was the biggest disappointment ever and this is why:
    Don't waste your money/Boots voucher on this.

    It didn't work from the off. 

    I thought it might be a dodgy one but I know a few people who have this and they have said the same.  I used it with a Stila smudgepot, a Bobbi Brown gel liner and various powder liners, in all instances all I got was a scraggly line.  Nothing like the smooth application that it boasted.  I thought washing it might help but it didn't do anything.  I've still got it in my brush collection but it's languishing at the back. 

    However, their i-Liner brush is very good. I used it to do this look and it works brilliantly when you're using a dark shadow as a liner on either your eyelid or to set the pencil on your waterline.  The only issue I have with that brush is that it's a bit long..you need to hold it at an angle but it picks up a nice amount of colour and for 50p, you can't ask for more.

    Saturday, 24 July 2010

    My Summer Face Essentials

    It's hot..hotter than we are used to in England.

    I have normal/combo skin which means that heat and me don't mix.

    This is what I'm using to keep my skin from looking a hot greasy mess and it's working brilliantly.
    Surprised that you don't see a primer? So was I.

    I used a primer when I went to the Body Shop bloggers event and it really highlighted dry patches that I didn't know I had.  Since that day, I've just been using my foundation alone and it's served me well.

    The toner is one of my saving graces, I just whack it on..wait for it dry, put my moisturiser on, let it sink in and then apply my foundation.  It stays put all day, doesn't apply in a streaky manner and gives me a dewy finish without making me greasy.  The eye roll on is there simply to provide extra moisture as the air conditioning at work has a habit of drying my eyes out.

    Sunday, 11 July 2010

    Review: Revlon Brushes

    I'd been looking for the eyeshadow brushes featured here for a while now and I was kindly sent the whole range to use and review.

    My initial thoughts:
    • The handles smell "woody" and the hairs have no palpable scent
    • Handles = perfect length apart from the eyliner brush..I've done some desi mechanics on it though.  For those of you who don't know what desi mechanics are, they're the sister of ghetto mechanics, i.e. making something work by doing some simple, at home tweaks.  My mechanics were to cut the handle shorter, file it down and paint it. 
    • Each handle has the name of the brush (more helpful than you would think!)
    • The handle width varies depending on which brush you use, for example, the handles on the foundation brush, the blush brush and the powder brush are very chunky which is conducive to how the product applies whereas the handles on the eyeshadow brushes are thinner
    • The hairs on all the brushes are very soft. I've mentioned this here because you don't want to read the same thing 10 times over

    Revlon Powder Brush RRP £10.99
    The brush doesn't feel cumbersome which is something to be welcomed when it comes to makeup brushes.  I've used  it a fair bit but then I gave it to my mum because she uses powder more than I do.

    She reports positively on its performance and I think it's pretty good too.  I use it for translucent powder and mi madre uses it for powder foundation and I feel that it distributes powder properly.  With my old brush, you could tell where I was wearing powder but application is pretty seamless with this one.

    Revlon Blush Brush RRP £9.99
    I feel this brush was made personally for me as it fits my cheek area perfectly (ooh er) and blending is a dream.  I tap the top part in my favourite blusher (currently this Korres one) and sweep the sides in the blush too. 

    The brush is fairly chunky which makes application even easier.

    Overall, I'm very happy with the brush.

    Revlon All Over Shadow Brush RRP £6.99
    I think the stiffness (har har) is spot on.  I use this to just add a shade all over my eyelid and blend it out.  The hairs are black which make it a bit hard to see how much colour you've loaded onto the brush but I think that's a minor point because who honestly doesn't dip back into their eyeshadow when they're blending?

    You get all the control you want and I think the results from using this brush are far better than any other blender brush I've used.

    Revlon Contour Shadow Brush RRP £7.99
    This was the brush I was most looking forward to using.  I've been trying to improve my application skills for ages and I think that I have finally cracked it and it may be in part due to this brush   It picks up just the right amount of shadow (no need to tap it off or anything).  The handle really lets you get into the crease and blend it on out.

    I'm quite happy with my skills now and this brush has worked it's way into my daily brush arsenal.

    Here are some practice eyes I did with the two brushes:
    I can clearly see a marked improvement comapred to what I usually come up with.  I used two shades of blue and a black shadow on the blue eyes so I'm chuffed at how well it blended.  The middle eye could have done with a bit more blending but I only learnt my final trick when I was doing the blue eye.  I originally did a "thick winged look" but then wanted to see if I could blend it up into a more rounded piece and I could!

    Revlon Eyeliner Brush RRP £6.99
    This was the last brush I used from the collection.  It's not because it's crap, it's because eyeliner is a fiddly thing and I don't have time to sit down and be all nicey nicey with makeup when I'm rushing off to work.  So, this is a pure weekend brush. 

    I have one simliar to this by Ruby and Millie but I decided to use it with my all time favourite gel liner (there's a post about that coming up, very soon) and it was a bit of a fail.  I don't think these brushes are made for gel liner..does anyone know what type of liner they are made for? The packaging didn't say and I can't see you using liquid liner with it simply because of logistics.

    I used my Smashbox powder liner and got better results..I'm a bit unsure about this one.

    Revlon Foundation Brush RRP £10.99
    I love the feeling of this brush. The hairs are pretty densely packed for a foundation brush but it is still fluffy enough to apply foundation properly.

    Blending was flawless and it took me literally minutes to apply a full face of foundation. It used to take me ages before but this brush is a brilliant time saver.

    I never used to wear foundation every day but since I've had this brush, it's become a daily occurence for me and I will be finishing my second (ever!) tube of foundation very soon. 

    Revlon Concealer Brush RRP £5.99
    I don't use concealer so I thought it a bit pointless if I reviewed a brush for that purpose because I wouldn't know what to look for.

    I handed it over to my cousin who has been using concealer since the day she was born and she absolutely loves it.  She used it with liquid concealers and solid concealers (she used this and this).

    She liked the fact that the brush was soft but still firm enough to apply concealer without making it look patchy.

    I personally like the way the hairs are coloured in a similar way to the foundation brush so that you instantly know that this is the concealer brush.

    I use it to apply a highlighter under the arch of my eyebrows and it places the product perfectly.

    All in all, these brushes are pretty good for the price and I'd recommend them all.  The handle on the eyeliner brush needs to be smaller but I find that's a problem with all eyeliner brushes, not something unique to this one.

      Monday, 29 March 2010

      Best.Eyeshdow.Brush.Everrrrrrr.

      This little beauty:
      It's a travel size brush but it's the same size as my No7 brushes and I like this size, it's perfect for putting in makeup bags and it gives you the right amount of control as you don't have to hold the mirror too far away so you can see what you're doing.

      You're meant to use this brush to pack on the colour and then use another brush to blend but I find that you can do a fair bit of blending with this but to get "proper" results, you do need a blender brush. The one "issue" I had was that I needed to make sure that I'd blended the colour a bit with this brush before using the blender as otherwise it all fell in on itself and I ended up with a massive smudge on my eye.

      If I used my other brush, I'd have had to apply colour a million times but with this brush, it's far easier.

      Here are a few blending experiments I've done with it, all colours are from the Sleek Original palette:


      I'm still a blending noob but I think I'm seeing some serious improvement and it's mainly down to this brush.  I also know that there is a lot of fallout around the eye area, if I was going out with my eyes like that, I would have tidied it up..

      What do you guys think? Tell me you're seeing improvement, if only to inflate my ego ;)
      Related Posts with Thumbnails